|
|
| ||||
|
| |||||
|
TRANSACTIONS A basic transaction consists of 5 elements. A transaction date, an amount, a description, an account to credit, and finally an account to debit. Of course you can get a little more complicated than that. You could have multiple accounts on the credit, debit or both sides. The key factor is that the sum of both credits and debits equal each other. In Common Cents, for the most part, you create transaction definitions as you first start using the system. Then as you repeat various types of transactions you only need to recall the definition record which includes the accounts to use in the credit and debit assignment. Common Cents also divides transactions into groups of types to keep definition lists cleaner and shorter. We will discuss each of of these types of transactions in detail. Check Purchase Transaction The check purchase transaction type is used to record the entry of check used to purchase something. When you enter the entry form, the first thing you need to do is select a transaction (definition) from the list. If you don't have anything to select or nothing is applicable for this transaction in the list, then you will need to click on the "New Transaction" button. 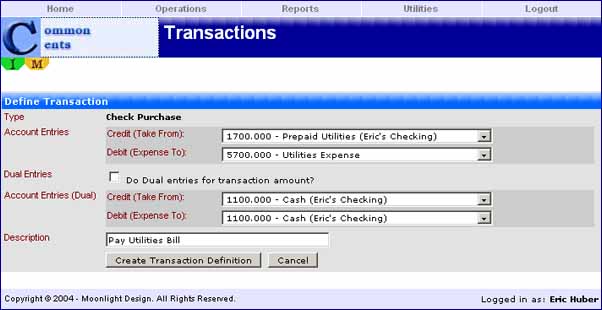 When you define a transaction, pick a credit account (usually an asset or liability account) and a debit account (usually an expense). Then give the definition a good description. This is key here. Your description needs to imply which accounts you are using to credit and debit. Look at the example above. The description states simply "Pay Utilities Bill". I know from this description that I'm expensing something to utilities, so that identifies the expense account. I also know that I'm crediting an asset account assigned to a checking account register (since this is a "check" transaction). Because of this narrow focus, and how my accounts are setup, the only account that fits the bill is my "Prepaid Utilities" account. The only variation I might do here is if I had two checking account registers defined. Each one would have its own set of Common Cents accounts assigned to it and so if this was the case and I paid this bill sometimes from one checking account and sometimes from the other, I would want to include the register name in the description to make sure I was selecting the right credit account. Now save your transaction definition and then look at the next dropdown. Merchant works similar to transaction in that you can select from the list of merchants you've dealt with before, or you can add a new one. When you add a new merchant record, you give it a name and a default memo. You can change the memo on a case by case basis, but the default value just gives you a starting point. 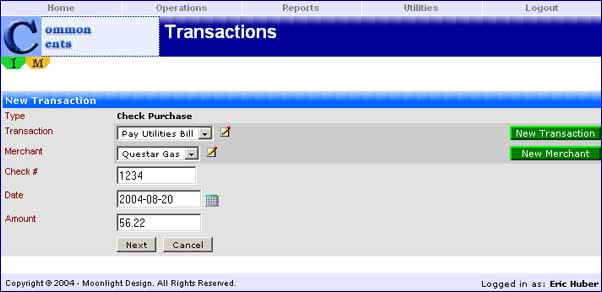 Now that you have your transaction and merchant selected, you can supply a check number, date, and amount and you are ready to confirm your transaction. 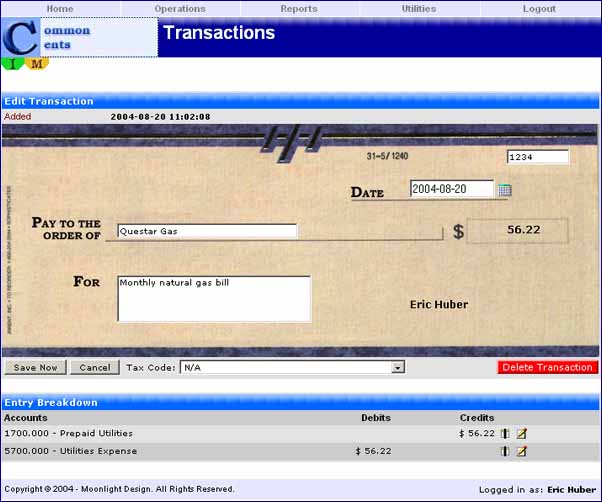 Confirming your entry gives you an overall picture of the transaction and here is where you can tweak it a bit if needed. Notice the entry breakdown section. At the end of each entry are two icons. The first one is a box with a black vertical line down the center. This is the "split" icon and is used to split the current entry into two entries. The second icon is the "edit" icon and it is used to edit either the account or amount of the entry. When you click on the split icon, you select a new account (of the same type as the account you are splitting out from) and an amount to allocate to it. In this example, I'll say $10 of my utility bill really shouldn't be classified as a utility expense and I'll allocate it to miscellaneous expense instead. 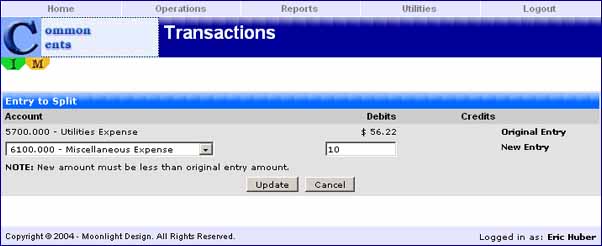 Now when it takes me back to the transaction edit form, the entry breakdown shows the new expense account and the original expense account amount has been modifed to keep the entry in balance. 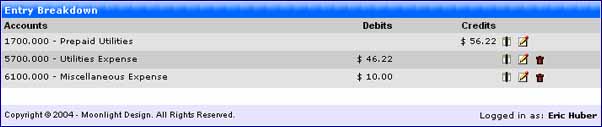 Notice now that we have two additional icons that give us the ability to drop one of the expense accounts from the transaction. The drop icon only shows up when you have more than one debit or credit entry. If you just have one of each, you would need to delete the entire transaction to remove both of the accounts. 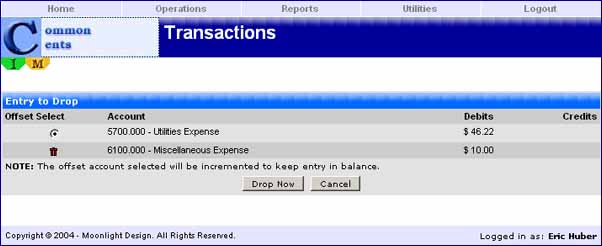 For this example I will drop the miscellaneous expense I just added. Notice that when you drop an account from the entry breakdown, you must assign the amount that was allocated to it to another account of the same type. In this case, the only other one is the original expense entry, so I just select "Drop Now" and I'm done. Once the transaction is verified and everything looks ok, you can save any changes and you are done! |
| Copyright © 2004 - Moonlight Design. All Rights Reserved. |